The photographer, who has died aged 80, was known for his hugely influential shots of post-independence Mali
With his electric style, Malick Sidibé, who has died aged 80, was the Malian photographer who changed the idea of black beauty in fashion.
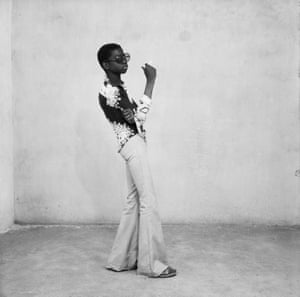
His most celebrated shots were the street photography that documented the jubilant fizz of post-independence in Bamako. With his 35mm camera, he captured the new urban elite: the Malians who had absorbed the stylistic cues of Jimi Hendrix, the Beatles and James Brown.
Sidibé captured the hip young things as they went from a colonial past to independence, resplendent in their leopard-print flares, finely cut berets and matching white outfits mid-dance.
When Sidibé received his Golden Lion lifetime achievement award at Venice’s Biennale in 2007, the art critic Robert Storr said: “No African artist has done more to … increase our awareness of the textures and transformations of African culture in the second half of the 20th century.”
To us here on earth we are so caught up with the magnificent photos that are being retrieved from outer space that we don’t give much thought as to who took them and how. There are some astronauts who now introduce themselves as being a photographer as well as an astronaut. A good example of this is NASA’s astronaut Don Pettit. According to Don taking these type of pictures means learning not only how to take the photos but when.
Space photography is not new and dates back to the 1960s. What really caught the attention of the space inspired public was the first view of earth taken from space and was dubbed the “Blue Marble” back in 1972.
These astronauts have a whole gambit of responsibilities that involves extensive training both physically and mentally, and added to this hectic roster is now perfecting their photography skills.
The photography teaching process all began way back in 1984. The astronauts gained their photography education from a 36 page Hasselblad manual. It taught the basics but was comprised as a detailed guidebook for astronaut photography assistance. It’s purpose was to teach photography basics and to perform simple but important duties, like how to stop the camera from shaking which no doubt was one of the most important pieces of information to be relied on, and battery changes. This camera manufacturer’s guidebook was to describe the use of the Hasselblad 500 EL/M cameras which were used on the U. S. Space Shuttle.
Just as space technology has come a long way since the 1980s so has photography.
The current outer space photography consists of the ISS and spacecraft being equipped with only the very best of equipment. It is no problem for the astronauts to livestream and produce high definition videos. It also means that this new breed of photography astronauts need to learn to speak the photography language. This means learning terminology like “shutter speed” and “atmospheric air glow images”, just as an example. This is on top of the requirement for there already having to be able to speak Russian which is mandatory for the astronauts.
Tips on how to be a NASA photographer
These are just a few highlight of space photography…
Flash modification is required for the space vacuum setting
Steadying of the camera for motion blur prevention
Managing the astronaut attire while taking the images
Setting the camera rate to be compatible with the orbital motion
Some astronauts are more enthusiastic than others with their photo taking. Jeff Williams compiled about 100,000 images during a six month stint in the orbiting lab in 2006. For Twitter users no doubt they have enjoyed the earth photography provided by Scott Kelly (retired NASA astronaut).
While space photography is beautiful to look at it also provides feedback that helps to enhance astronaut safety.
Sure, you could buy a drone from DJI. Or you could build and customize this one.
Quick note: This project uses components from Erle Robotics. I'm not affiliated with the company or its founders, but I do dig their work and open-source ethos. If the scene interests you, a couple other suppliers of robotics components for Raspberry Pi-based projects are Dexter Industriesand PiBOT. I'll be bringing you more tutorials from across the makerverse down the line.
Part of the fun of robotics in 2016 is that it can serve as a relatively low-cost hobby, one that tests and enhances your hardware and coding chops. That's largely due to the Raspberry Pi and other cheap micro controllers, to hundreds of components and shields available for custom hacks, and, of course, to an open source community that supports sharing information and advice.
Erle Robotics, which I mentioned in last week's piece about the increasingly important role of Linux in robotics, supplies cheap components for DIY Raspberry Pi projects. I got in touch with the makers at Erle this week to come up with a great tutorial for our readers.
Introducing the $200 DIY smart drone. The project comes courtesy of Victor Mayoral Vilches, a roboticist from Spain, and edited versions of his instructions are included here with permission.
What you'll need
Components
Erle Robotics PXFmini
Raspberry Pi Zero
HobbyKing Spec FPV250
Erle Robotics PXFmini compatible power module
Tools
Soldering iron (generic)
Tape
Screwdriver
Apps / Online
APM flight stack
Debian-based Linux file system for drones
Tutorial
This tutorial demonstrates how to build a Linux drone with the Raspberry Pi Zero that costs less than $200. The drone uses a real-time capable Linux kernel, a Debian-based file system, and Dronecode's APM flight stack compiled for the PXFmini autopilot board from Erle Robotics.
The Pi0drone and its components
Step 1: Assemble the drone kit
Time: ~30 minutes
Once you get all the components start by assembling them. This is where the fun of DIY hardware comes in. Use the picture above for reference.
Get the black frame together and place the motors on top.
Fix the ESC (Electronic Speed Controllers) to the frame using some tape and connect them to the motors.
Put together the power (red) and ground (black) ends of the ESCs into the individual cable (to be connected later to the battery) and fix everything underneath the frame.
Adjust the power module connectors to the battery ones. There are several ways to do this, but here's a quick one: a) cut the connectors and solder battery and power module together (do it one at a time, being very mindful of short circuits); b) cut the other end of the power module and resolder the battery connector (previously cut) at that location;Done! This will allow us to easily connect and disconnect the "battery+power module" to the drone.
Place the "battery+power module" pack underneath using the velcro included in the package.
Step 2: Ready the autopilot
Time: ~30 minutes
Connect the PXFmini shield on top of the Raspberry Pi Zero. Use this image for orientation reference:
ThePXFmini (stands for PixHawk Fire Cape mini), a $75 autopilot shield for the Raspberry Pi to build robots and drones.
You're almost done but you still need to get the right software on the Raspberry Pi Zero+PXFmini set. This should include the flight stack, an appropriate kernel, enabled daemons that auto-launch on boot, and additional goodies.
If you purchase the PXFmini from Erle Robotics you get access to their Debian images, so you can just fetch a PXFmini compatible Debian image and flash it into a microSD card.
Step 3: Mount the autopilot
Time: ~5 minutes
PXFmini mounted on top of the Raspberry Pi Zero assembled in the drone
Mounting the autopilot (Raspberry Pi Zero + PXFmini) in the drone can be done a few ways.Pick yours and connect the JST GH cable from the power module to the PXFmini. This will to power the autopilot when the battery gets connected.
Next you'll need to mount the PWM channels in the autopilot. Get your ESC cables and connect ESC 1 (corresponding with motor 1) to PWM channel 1, ESC 2 to PWM 2 and so on.
Step 4: Mount the propellers and get it flying!
Time: ~15 minutes
Two of the propellers turn clockwise (marked with an "R") and two turn counter-clockwise. Place the clockwise propellers on motor 3 and 4 and the counter-clockwise propellers on motors 1 and 2. This is a pretty important step to get right.
Now you'll need to decide how to control your drone. You've got some options.
• WiFi + gamepad: Have the autopilot create its own WiFi network with a USB dongle (Erle Robotics images support this by default) and use a common gamepath to control the drone through a Ground Control Station;
WiFi + ROS: The Robot Operating System(ROS) is awesome. You can use a ROS node to visualize the flight mode and control the drone. If you want to go this route, check outthis video;
Traditional RC: Alternatively, you could buy an RC controller with a PPMSUM-enabled receiver and attach it to the autopilot (to the PPM-SUM input channel);
And that's it! Here's a video of the drone in action using the traditional RC method.
Questions on the tutorial? Leave 'em in the comments.
If you are willing to get up early or stay up super late, Milky Way season is back in North America! Above is a shot I made on February 14th, 2016, in Sedona, Arizona. This image was taken at 5:45 AM, just prior to sunrise. Something I tried for the first time with this photo is taking 10 consecutive shots of the sky at a higher ISO (5000) and shorter shutter speed (15s), and then stacking the photos, which gives you awesome pinpoint stars with minimal noise.
Here’s a walkthrough of how I made the shot.
Ever since I moved to Flagstaff, I have always wanted to get a shot of the Milky Way rising over Cathedral Rock in Sedona, AZ from this particular location. In order to determine when the galactic center of the Milky Way would rise over Cathedral Rock from this particular vantage point, I used the app PhotoPills on my iPhone. This told me the exact time and location this would happen.
The Milky Way was going to rise above the horizon a little after 4 am local time, so a friend and I arrived at the location around 3am. This would give us enough time to find the composition we wanted and take some shots of the foreground, using light painting to illuminate everything since the moon set the previous evening.
Shooting the Foreground
Here are the two unedited shots I used for the foreground, each 30 seconds at ISO1600 and f/2.8. In hindsight, I should have taken more in order to get more of the cactus in focus.
To “paint” the foreground, I stood about 30 feet to camera-right using a cheap headlamp from Wal-Mart. I was about even with the camera and then using trial and error I found the right speed to shine the light across the foreground to get the desired look.
Shooting the Sky
For the sky, I tried a new technique that turned out really well. I took ten consecutive shots (around 5:45 AM local time) of the sky with a high ISO (5000) and shorter exposure (15 seconds), each at f/2.8. You can do a much higher ISO if you want and an even shorter exposure to get even more pinpoint stars. I previously always used a 25 to 30 second exposure with a lower ISO, but even at 15mm the stars would still streak just enough to bug me. Here is what one of the ten shots looked like straight-out-of-camera.
Stacking the Sky Images
I downloaded Starry Landscape Stacker for Mac ($19.99) and then loaded my ten 16-bit .tif images into the program. They have a detailed instructional video on their website that teaches you how to use the program. It is pretty straightforward.
Once the ten images loaded (depending on the speed of you computer, it could take a few minutes), this is what appears:
Each red dot is supposed to represent a star. You may notice some dots not in the sky, so for these you can just erase them using that feature (on the left hand side). It is just like using the brush tool in PS. You can see the additional line of red dots I added manually along the edges. This is something they go over in the tutorial and it basically helps the program stack the stars better.
I did this for both the sky and the reflection of the sky in the water. You then click “Find Sky” (top left), and let it do its work. This was the resulting image:
You can see some areas that aren’t shaded blue, so just use the brush tool on the left and add in areas that are sky and remove areas over land, if necessary.
Once you’ve done that, just hit “Align and Save” and it will save the file as a 16-bit tif file (if that is what you uploaded). It will also save the mask of the sky so you can quickly load that in PS. Here is a look at a single image (of the ten) compared to the final output image (Before is top and after on bottom):
The next step was opening the three photos (one of the sky, two of the foreground) as layers in PS. I auto-aligned the photos and cropped the images as necessary. After blending the two foreground images, this was the result:
I then masked out the sky and used my shot created in Starry Landscape Stacker. This was the result:
I wanted the reflection to be from the same shot as the sky so that it looked right. The foreground shot was taken before the Milky Way rose, so that is why it is not visible in the foreground shots. I masked out the pond as best I could and feathered the edges. I also applied a little Gaussian Blur so that it would blend in on the edges and not just look like some black paint was thrown on the image. This was the result:
This was my first time ever doing something like this, so it took me quite a while to get the water and reflection to look acceptable. After I was done with this I threw the image into Adobe LR and edited the sky.
Everything I did to the sky, I also did to the reflection. I raised the clarity in the sky, increased the contrast, and bumped up the exposure just a touch. I also applied lens correction, which I probably should have done before anything else. I found that using the relatively new “dehaze” feature in LR over the Milky Way helped bring out some more detail.
I hardly used this, just moved it to (+5), but that was all that was needed. I then brought up the exposure a bit on Cathedral Rock (using the brush tool) and did used the dodge and burn technique on the Milky Way. All of this could have been done in PS, but I am more comfortable with LR, so that was my method of attack. This was the resulting image:
About the author: Cory Mottice is a photographer and meteorologist based in Flagstaff, Arizona. You can find more of his work on his website, Facebook, Twitter, and Instagram.